• Welcome to H4O! For a reduced ad experience, please login or register with the forum.

Replacement Upper Control Arms

cbetts

NERD!!!
Messages
3,188
Location
Rancho Palos Verdes, CA
Well, it appears my Dorman upper control arm is shot after only one trip up Last Chance Canyon and about 2000 miles highway.

The cup pressed into the aluminium has come loose. Finally, the source of issue I have been chasing for the last two months..
IMG_20150208_132557_434.jpg


Looks like Moog may have the same issue. Anybody else having this issue?
 

Cyouincourt007

Pavement Prince
Messages
542
Location
Miami,Fl
I have to check mine, pretty sure my stock ones are shot. I have heard some weird rattling when taking hard left turns on highway interchange spot. Isn't that a way too short life span last canyon and 2k hgwy and its shot already?
 

06 H3

a.k.a. "The Jackal"
Messages
9,505
Location
Meridian, ID
thats bull****! 2k miles!?!? I have a ton of spare uppers. they are probably shot but it might be worth while to ship a pair to total chaos or an other ifs company and have them mirror image an aftermarket replacement with greaseable ball joints and replacement bushings.
 

rsc

Well-Known Member
Messages
1,087
Location
Tulsa
That would be great if we had that, wasn't someone going to do that about 3 years back?
 

RamRod

Well-Known Member
Messages
3,914
Location
AB, Canada
I priced it out with a local shop and to get a run of 10 would be about $600 for a pair..... decided that was crazy and left it at that.
If someone were to get a better price I would put a deposit down to secure the deal
 

Highatop

Well-Known Member
Messages
600
Location
Florissant, Co.
I'm about to replace my driverside upper also. I ordered an got the Dorman Dor521-949. Is there anythin I should be worried about this part or company also, anythin about the install...
 

amrg

Well-Known Member
Messages
2,317
Location
Qatar
I priced it out with a local shop and to get a run of 10 would be about $600 for a pair..... decided that was crazy and left it at that.
If someone were to get a better price I would put a deposit down to secure the deal
600 USD is how much the dealer charges for a pair in this country (ridiculous I know)
 

cbetts

NERD!!!
Messages
3,188
Location
Rancho Palos Verdes, CA
I'm about to replace my driverside upper also. I ordered an got the Dorman Dor521-949. Is there anythin I should be worried about this part or company also, anythin about the install...

Yep, those are the ones I am having an issue with right now. I know several people here are running Dormans. Just curious if they had the my issue. I will probably order a new Dorman if I don't hear anything. I would like to keep both left and right the same.
 

Best4x4

Well-Known Member
Messages
1,042
Location
Vidor, TX
Unless you ordered the part online Dorman should have a warranty on that upper control arm if it failed so soon! I wouldn't order a new one until you contacted them about it first.
 

4speedfunk

Well-Known Member
Messages
4,250
Location
Tardville
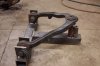
Fabbing new tubular uppers is not rocket science...especially if you want to keep stock geometry. You simply need some good RH and LH donors (Squeaky) and some scrap steel.

First lay them out on a flat piece of 1/4" steel, or build a frame for them. Then insert some locating pins into the bushings, and a similar pin on the centerline of the ball joint. Weld those pins to the plate, along with any other critical locating blocks (to compensate for bends or offsets in the A-arms). Then remove the stock A-arm. This is your new welding fixture. Ta-Da! Many pics can be found on Google images...
attachment.php


Once you have RH and LH jigs made, you need to get the bushings & bushing barrels for the pivot points. Also you would need to find the ball-joint and sleeve for the outer end. All of this stuff can be found online. I assume re-using the stock eccentric bolts would be part of the build, so you could adjust the camber just like stock. If not...the truck could be converted to use shims between the pivot shaft and the frame (like many other vehicles use). Then slip your three critical points onto the pins on the fixture, grab the appropriate tubing, a bender, a welder, and go to work. With the fixutre, you can make 1 or 1000 of them the same every time. I think the difficult part would be if you wanted to adjust the geometry or change some angles...then you get into some math and theory that's way over my head.

You might also approach a company called UMI. They make really nice replacement suspension parts for many applications. I bet they have an entire room filled with welding fixtures for each application. Send them Squeaky's arms and they might be able to crank some out....
http://umiperformance.com/catalog/index.php?main_page=index&cPath=8_59
 

Attachments

  • DSC_6053.jpg
    DSC_6053.jpg
    112.8 KB · Views: 4,939
Last edited:

atvspeed4

Well-Known Member
Messages
1,211
Location
massachusetts
I am building version 2.0 right now. I wish it was as easy as you say it is. Developing a compact balljoint that can fit in the space constraints, be durable enough to survive (salt, sand, mud etc) and be produced at a cost that people will buy them is not easy. Using a uniball with adapter pin is not the answer nor is it cheap. A little search on google will show that many people complain about the short lifespan they have experienced running uniballs in the northern elements that some of us live in.
 

4speedfunk

Well-Known Member
Messages
4,250
Location
Tardville
Oh yeah... that goofy cross-bolt thing. Forgot about that.

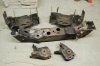
Pretty much any ball joint you find will have a tapered pin, and the H3 ball-joint uses a weird non-tapered pin with a pinch bolt arrangement. The upper hole at the knuckle is "split", and if I recall the underside of the hole is not flat. Normally, I would just weld-up the split and re-taper the hole to match the taper of the new ball-joint pin but...because its not flat underneath, it would be tough to put any sort of castle nut on the underside. Not to mention, as you tightened it to 90 ft/lbs...you would probably re-split the knuckle hole at the weld you just made. Doh!

Hmmm. No matter how I re-think it....I always come back to the same conclusion....

attachment.php
 

Attachments

  • Hummer parts 064.JPG
    Hummer parts 064.JPG
    146.8 KB · Views: 1,600

atvspeed4

Well-Known Member
Messages
1,211
Location
massachusetts
haha yeah not an easy project but it is definitely possible. The first set I ran made a huge difference in removing the slop in the front suspension. Anyone ever see how much the control arm shifts when you hit the brakes hard?
 
Top